Conditional formatting allows you to show data in display lists with very rich markings, colors, icons, progress bars etc. This allows you to highlight the information you need the most and to make sure you pay the most attention to the data that deservers it most.
An example of a display list with conditional formatting applied is shown bellow:

Applying conditional formatting
Conditional formatting is applied from the per field settings in view update or view creation page. First select the field that you want to be formatted 1. Per field settings section that contains button for applying conditional formatting 2 is shown.

After pressing the Conditional formatting button 2 a section for rules is displayed 3.
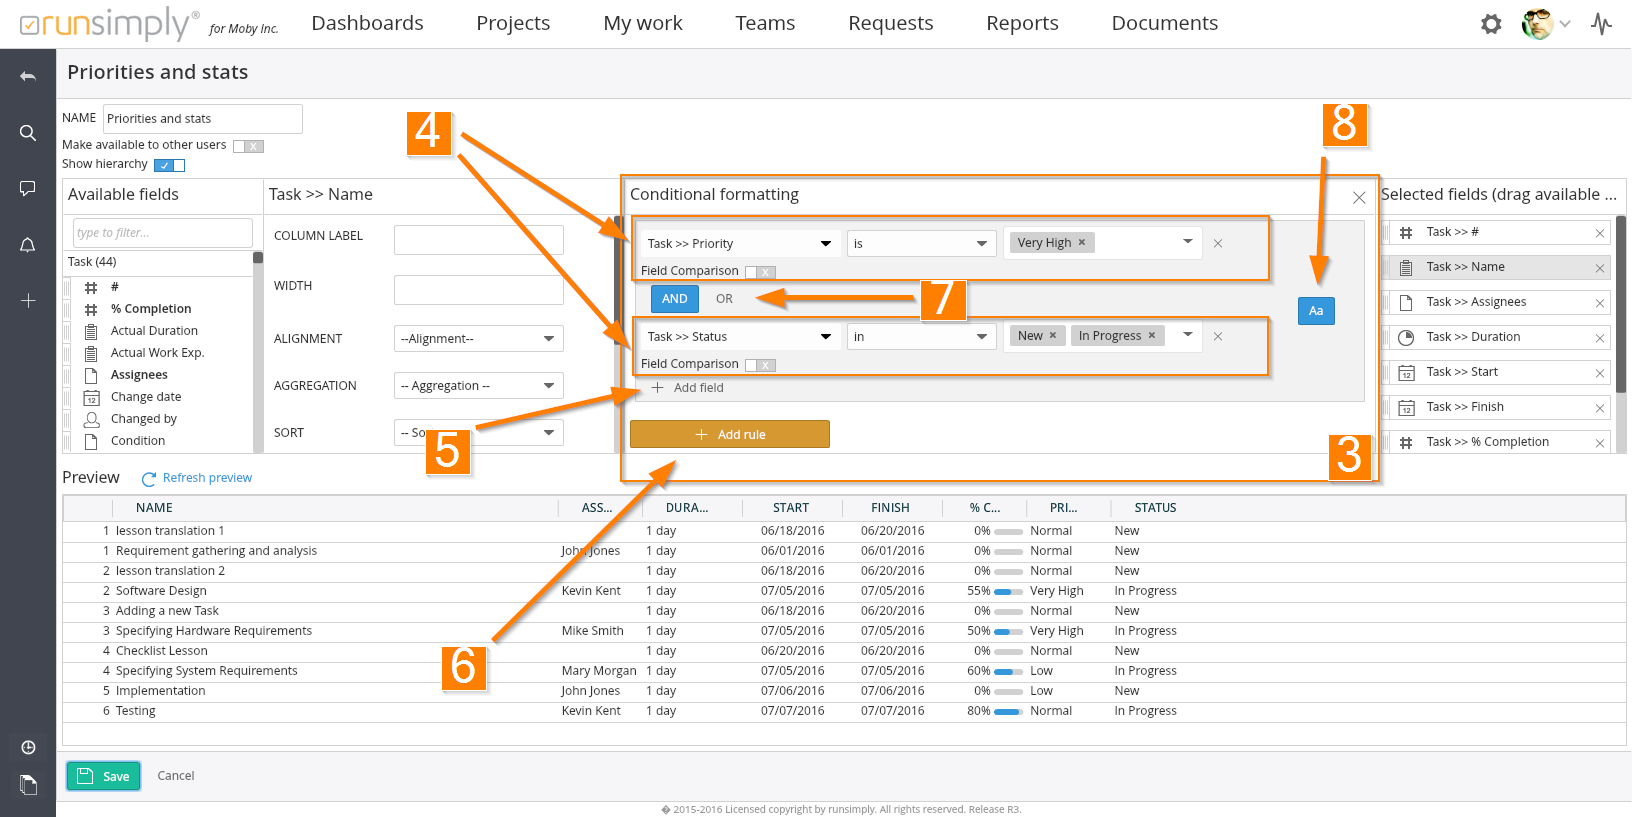
Start by adding a field into the first rule 5. When you create conditional formatting what you do is create a set of rules and every rule has it's own set of formatting options that are applied if the rule is accepted. For example, you might say: 'I want names of tasks that have high priority to be displayed in red color and all tasks that have low priority to have names displayed in green color'. Those would be two rules with different formatting options.
Rule consists of a group of conditions 4 and formatting options 8. When rule conditions are met, that rule's formatting options are applied.
NOTE: Rule conditions don't have to have the same field as the field that you are creating the conditional formatting for, they can be different. For example, you can format task name when task priority is high but, ofcourse, you might format task priority column depending on it's own value.
Conditions within a rule are connected either by conjuction or disjunction (AND or OR) 7. Rule can have as many conditions as you need.
Number of rules for a particular field is also not limited. You can have as many as you need.
Creating conditions is almost the same as creating conditions for filters. The main difference is the field comparison option. Field comparison lets you create a condition in which you compare a field not with a value but with another field. You might for example say: 'I want all task names to be green if their creator is the same as their assignee'. For that you would use field comparison.
NOTE: After you add a conditional formatting for a field, that field will be displayed with orange highlight in selected fields section to let you know that it has conditional formatting defined.
Formatting options
After you have setup your rule conditions, you can create formatting options by pressing on the formatting button 8 that opens a formatting page 9.
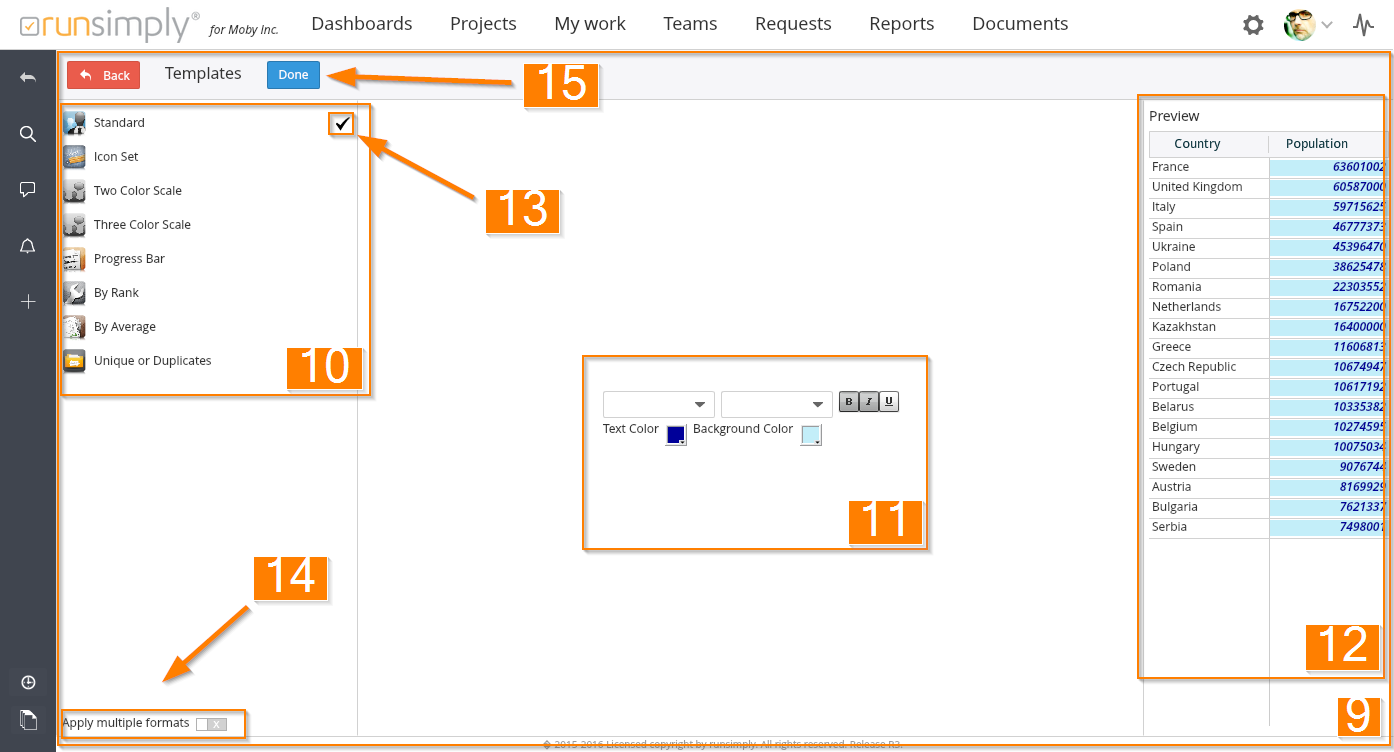
There are several types of formatting options displayed on the left side of the page. When you want to apply a certain type, click on it and it's options are displayed in the center of the screen 11. When you want to disable it, just click on it again.
You can check what your formatting options would look like applied to real data in previewer on the right side 12. Previewer is automatically updated as you change formatting options.
You can also apply mutliple formatting types at the same type by enabling this feature at the bottom of the screen 14. You can apply as many types as you want. You will easily see all those formatting types that you have applied, they have a checkmark displayed 13.
NOTE: When you apply mutliple formatting types that contain the same formatting options, for example bold, italic, font color etc. they will be applied in the order that you see them on the screen. For example you might say 'I want the values to be bold with Standard formatting type and I want to apply Rank formatting type that will not be bold for the first 5 items'. In this case first the bold would be applied to all values after which the first 5 values would get the 'not bold' value.
Formatting types
The first type is the Standard type. Here you can apply font style, font size, bold, italic, underline, font color and backround color. These styles are applied to all values for the conditional formatting rule.
Icon set formatting type adds an icon to the value on the screen. By default icon is shown before the value in display list but you can say that you don't want the value to be displayed at all, only the icon. These styles are applied to all values for the conditional formatting rule.
Two color scale formatting type enables you to create a gradient between two colors. Gradient is applied gradually from the minimum value to the maximum value. Instead of minimum and maximum value you can also select specific value or a percentage value. For example, you can create a gradient for a project budget field that goes from green to red color and you can say that green starts from the value 1000 up to 80% of the highest value of budget.
Three color scale works the same as two color scale formatting type but it allows you to use three colors.
Progress bar formatting type works just like two color scale but instead of showing gradient from one color to another, a progress bar is drawn on screen.
You can use rank formatting to highlight only the top or bottom elements by their values. This formatting type contains the same formatting options as standard type. For example, you can say that you want to display in bold and blue color the top 30% of all values.
Avarage formatting type allows you to highlight those values that are above or below the average value of all values. This type contains the same formatting options as standard formatting type. You can for example say that you want all values that are above average to have a blue background color.
Duplicates or uniques formatting type lets you format values if they are unique among all values or if they are duplicates. This formatting type contains the same formatting options as standard formatting type. For example you can say that you want to format all projects that have a unique project manager working on them i.e. project managers that don't work on any other project.
After you are done editing formatting you can confirm your formatting setup by clicking on Done button. Have in mind that clicking on Back button will not save your settings, it will just return to the previous screen.
Like and share